Apache, PHP & vhosts
Apache configuration is one of the stumbling blocks that keeps a lot of web designers from using programming languages like PHP. This page is geared toward web designers with little to no previous knowledge of how to use terminal or configure Apache.
Introduction to Apache on your mac

When making websites and testing them locally you won’t be able to use server side programming languages like PHP. You also can’t use absolute paths to files or images which is a major drag. If you have a mac with OS X though you have the Apache web server already installed on your computer. You just need to turn it on and do some configuration and you can develop your sites locally instead of uploading your files to a remote server every time you want to see a change.
One Time Setup Steps
- Read the disclaimer
- Your Sites/ Directory
- Starting Up Apache
- Opening Terminal
- Editing httpd.conf
- Making Your my-vhosts.conf File
- Editing Your hosts File
- Restarting Apache
Steps to take each time you add a new site
One Time Setup Steps
1. Read The Disclaimer
This tutorial walks you through making changes to your system’s default installation of Apache, it’s been tested on a few computers running OSX 10.3, 10.4, & 10.5 and everything has worked great. This does not however mean we guarantee it’ll work for you.
Use this tutorial at your own risk: We’re not in any way responsible for any errors in this text, or any damage that may result from misunderstanding the tutorial.
If you aren’t very interested in learning about how to configure Apache and you’d rather it just worked, you may want to check out MAMP and VirtualHostX.
Still with us? If so, get a cold drink and get comfortable because the one time setup steps can take a bit of time if you’re new to this stuff.
2. Welcome To Your Sites/ Directory
- Go into your user’s folder in your hard drive, we’ll be using your user name later, so try to remember it.
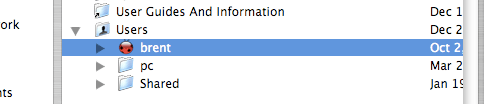
- Inside your user directory is your Sites/ directory (NOTE: the name of this directory on spanish language computers is ‘Web’ in the finder, but on the system the name is still ‘Sites’, so for the rest of the tutorial when you see ‘Sites’ that’s good for spanish language systems as well and it’s case sensitive {use an uppercase S})
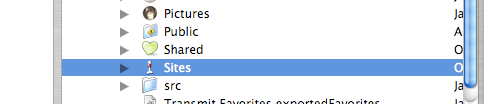
- Any websites you make that you want to preview locally using PHP should go into this directory. For now we’re going to add a directory called test. Each directory in here will be it’s own site, so inside this ‘test’ directory you should have an index.php file with some HTML in it so we can test to make sure everything works. Note: You can just rename any .html file you have to .php and put it in there. Right now you will not be able to see this file because we haven’t setup anything yet, but after we’re done you’ll be able to get to it by putting http://test/ into your browser. You can try it if you want now but it shouldn’t work
3. Starting Apache
Set Your System Preferences
- Starting Apache on OS X is very easy, first go to your System Preferences and click on the Sharing icon.

- then check Personal Web Sharing
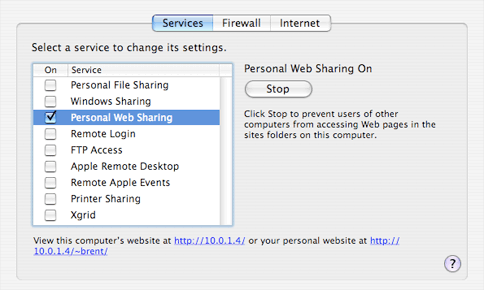
Test To Make Sure Apache Is Running
- To test it out, type this into your browser 127.0.0.1 (this is a short way of saying your local computer)
- You should get a message that says:
If you can see this, it means that the installation of the Apache web server software on this system was successful…
4. Open Your Terminal
- Now that you have Apache running we need to tell it where your websites are. The first thing you’ll do is open your Applications Folder and go into the Utilities Folder

- Inside Utilities you’ll find a program called Terminal. You may want to add a shortcut to it in your dock.
- Open Terminal you should get a prompt that shows your user name. (we’ve replaced it with *yourusername*)
12/Users/*yourusername**yourusername*:~ *yourusername*$
 Hit the round dot with the + in the upper left corner of the window to maximize the window. Soon we will be opening a text editor from terminal and it doesn’t let us resize the terminal correctly after it’s open.
5. Opening and Editing httpd.conf
Because Leopard upgraded to Apache 2 and PHP 5, your httpd.conf file is in a different location depending on your version of OS X.
Opening the file
- If you’re using OS X 10.5 (Leopard), copy and paste this command into your Terminal and hit enter to launch the pico editor which comes with your system. If you own TextMate or BBEdit, you can use the words ‘mate’ or ‘bbedit’ instead of ‘pico’ in the following examples and you won’t need to use these clunky editors.
1sudo pico /etc/apache2/httpd.conf
- If you’re using OS X 10.3 (Panther) or 10.4 (Tiger), copy and paste this command into your Terminal and hit enter (replace the word ‘pico’ with ‘mate’ if you own TextMate or ‘bbedit’ if you own BBEdit)
We’re using the UNIX command sudo, which means ‘super user do’. Since this is a protected file on your computer that you don’t want just anyone editing, sudo lets you edit it, provided you type in your system password and hit enter.1sudo pico /etc/httpd/httpd.conf
Enabling PHP
- This brings up the Pico text editor in your window. We are going to use the shortcuts listed at the bottom of the screen to do most of our work for us.
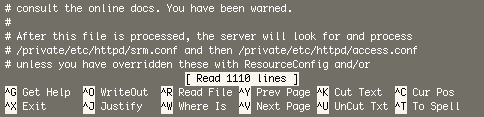
- Notice how they list commands with a carrot character and a letter at the bottom of the terminal window. This means you need to hold the CTRL key and press the letter for the command you want.
- The first thing we’re going to do is find the area for loading the PHP module. To do this we will use the ^W Where Is command. Go ahead and press CTRL + W. It will bring up a search line at the bottom where you can type in text. Let’s search for the words LoadModule php and press enter
- This area is where you turn on and off the different modules that are loaded by Apache. To turn on PHP (and Perl if you want to) we need to un-comment the lines with those modules. Anything after a ‘#’ (til the end of a line) is commented out, so un-comment is done by simply removing the ‘#’ at the beginning of the line. By default, PHP and Perl are commented out, which looks like this:
1234#LoadModule perl_module libexec/httpd/libperl.so#LoadModule php4_module libexec/httpd/libphp4.soLoadModule hfs_apple_module libexec/httpd/mod_hfs_apple.soLoadModule bonjour_module libexec/httpd/mod_bonjour.so
- Once you un-comment them, it should look like this:
1234LoadModule perl_module libexec/httpd/libperl.soLoadModule php4_module libexec/httpd/libphp4.soLoadModule hfs_apple_module libexec/httpd/mod_hfs_apple.soLoadModule bonjour_module libexec/httpd/mod_bonjour.so
- If you’re using Leopard you won’t see the Perl line, just php and it’ll be PHP5 as we mentioned earlier. I’m not sure if this means that perl is on by default or what, I don’t use perl much so if you know please email me.
- If you’re using Panther or Tiger, you’ll also need to uncomment the addModule lines for PHP and Perl as well, if you go down a bit more in the file you’ll see them, after uncommenting them they’ll look like this:
12AddModule mod_php4.cAddModule mod_perl.c
Including my-vhosts.conf
Next, we’ll include a file that defines our virtual hosts (our websites).
- If you’re using OS X 10.5 (Leopard) use the ^W where is command to search for ‘Virtual Hosts’
- You’ll should see this section:
12#Virtual Hosts#Include /private/etc/apache2/extra/httpd-vhosts.conf
- We’re going to un-comment the Include line and change the path to look like this: (change your username)
12#Virtual HostsInclude /Users/*yourusername*/Sites/my-vhosts.conf
- If you’re using OS X 10.3 (Panther) or 10.4 (Tiger), go to the end of the document by using the ^V Next Page command until you reach the end, then comment out the Include line they have down there and paste in your own, to look like this:
we’re pointing to a file in your Sites/ directory instead of where they suggest because it’ll be easier for us to edit it with a regular text editor in the future and it just makes sense to have the file there because this is where the rest of your websites will live. Also don’t forget to change *yourusername* to your actual user name.12#Include /private/etc/httpd/users/*.confInclude /Users/*yourusername*/Sites/my-vhosts.conf
Save the file
- Now we’ll save the file, which you can do with the ^X Exit command. There’s probably another way to save, but this is how I’ve been doing it and it works fine; go ahead and hit CTRL + X this will ask you if you want to save, press the Y key, now it will ask you what to name the file, the current name of the file is already in there, so press enter to overwrite it.
- If you made a mistake and you don’t want to save the file, you can of course hit N instead and get back to where you stated at the command prompt.
6. Making your my-vhosts.conf file
- This file we can make with any text editor, so move over to one you’re more comfortable with and start a new document and paste in the following code:
1234567891011121314151617181920####### Override some of the default httpd.conf settings ######### listens to 80 which is your local computer ##NameVirtualHost *:80## Changes default permissions for directories that Apache has access to ##<Directory />Options ExecCGI FollowSymLinksAllowOverride allAllow from all</Directory>####### virtual hosts #######NameVirtualHost test:80<VirtualHost test:80>DocumentRoot /Users/*yourusername*/Sites/testServerName testRewriteEngine on</VirtualHost>
- The part labeled ####### virtual hosts ####### is where you will add the sites you make. So far there is one vhost called ‘test’. You will need to change the part that says *yourusername* to be the exact name of your user directory.
- Save this file in your Sites/ directory.
7. Editing our Hosts file
- Now back to terminal again, we need to also edit our Hosts file, just copy and paste this command into your terminal and put in your password
1sudo pico /etc/hosts
- When you open the file it’ll look like this:
123456789### Host Database## localhost is used to configure the loopback interface# when the system is booting. Do not change this entry.##127.0.0.1 localhost255.255.255.255 broadcasthost::1 localhost
- We’re going to add this line after everything:
1127.0.0.1 test
- when done, it’ll look like this:
12345678910### Host Database## localhost is used to configure the loopback interface# when the system is booting. Do not change this entry.##127.0.0.1 localhost255.255.255.255 broadcasthost::1 localhost127.0.0.1 test
- Save the file, if you forgot how to do it re-read how to save a file in PICO
8. Restarting Apache
- copy and paste this command into Terminal and hit enter
1sudo apachectl graceful
|
1 |
sudo kill -hup `cat /var/run/lookupd.pid` |
Does it work?
You should now be able to see your website by going to http://test/ in any web browser on the computer you setup. You can even simply type test into the browser and get the page.
If you are still having problems let us know and maybe we can help
If it did work but there’s something that you thought could be clearer, let us know how we can improve the tutorial.
Steps to take each time you add a new site
1. Add A New Site (directory) to your Sites/ folder
- Every time you start a new website you will want to put it inside your Sites/ directory. The name of the site should be something short so you can easily make the changes below. For instance, something like Woody Allen Website is BAD, instead just call it woody and to remember the capitalization. I find it easiest to just never capitalize directory names. For the purposes of this tutorial we’re calling our site newsite
2. Adding a new site to your my-vhosts.conf file
- Open the my-vhosts.conf file, located in your Sites/ folder, in any text editor. Assuming you created the file earlier in this tutorial, it should look like this:
- You should see our test site’s code which looks like this:
123456NameVirtualHost test:80<VirtualHost test:80>DocumentRoot /Users/*yourusername*/Sites/testServerName testRewriteEngine on</VirtualHost>
- You could just change all references to the word test to newsite. But we’ll assume you wanted to keep the test site working and have newsite working as well. We’re going to add a new entry above test and change all references of the word test to newsite. When done it’ll look like this:
12345678910111213NameVirtualHost newsite:80<VirtualHost newsite:80>DocumentRoot /Users/*yourusername*/Sites/newsiteServerName newsiteRewriteEngine on</VirtualHost>NameVirtualHost test:80<VirtualHost test:80>DocumentRoot /Users/*yourusername*/Sites/testServerName testRewriteEngine on</VirtualHost>
- You will need to change the part that says *youruser* to be the exact name of your user directory.
- Save and close the file
3. Open Your Terminal
- Now that your site directory (called ‘newsite’) is in your Sites/ directory, open terminal. You should get a prompt that shows the name of your computer. If you don’t remember how to do this, re-read the instructions for opening terminal.
4. Adding a new site to your Hosts file
- Now we’ll edit our Hosts file, just copy and paste this command into your terminal and put in your password
1sudo pico /etc/hosts
- When you open the file it’ll look like this:
12345678910### Host Database## localhost is used to configure the loopback interface# when the system is booting. Do not change this entry.##127.0.0.1 localhost255.255.255.255 broadcasthost::1 localhost127.0.0.1 test
- We’re going to add the name of the new directory newsite after the one we already have test separating the two with a space. When done it should look like this:
12345678910### Host Database## localhost is used to configure the loopback interface# when the system is booting. Do not change this entry.##127.0.0.1 localhost255.255.255.255 broadcasthost::1 localhost127.0.0.1 test newsite
- You can add as many sites as you want this way, just separate them by a space and keep them on the same line
- Save the file, if you forgot how to do it re-read how to save a file in PICO
5. Restarting Apache
Follow the instructions above for Restarting Apache
Does it work?
You should now be able to see your website by going to http://newsite/ in any web browser on the computer you setup. You can even simply type newsite into the browser and get the page.
If you are still having problems let us know and maybe we can help
If it did work but there’s something that you thought could be clearer, let us know how we can improve the tutorial.
Credits
Thanks to Justin Blecher for getting us started with vhosts and Jessica Chen for letting us use her computer as a guinea pig.
To keep up with our web development articles subscribe to the mym-dev RSS feed